水耕栽培で使用する液肥の濃度管理のためECメーターを作成します。取得したEC値をネットワークを介してPCやスマートフォンで管理できるようになります。
例えば、水耕栽培でよく使われる「ハイポニカ液体肥料」の商品説明には、500倍に薄めて使用するように指定があります。当初作成するときは良いのですが、蒸発した液肥を補充したり、雨水が混入して薄まった場合などは濃度を計測する必要性が生じます。
ECメーターは安価に販売されていますが、データの蓄積や遠隔地での監視を行うため、ESP32で値を取得できるようにECメーターを作成します。
このページは、
【講座】水耕栽培入門-自動制御装置で作る手間いらずの水耕栽培システム
【講座】Arduinoで10種類のセンサー・アクチュエーター・LEDを制御
の追加情報を記載しています。
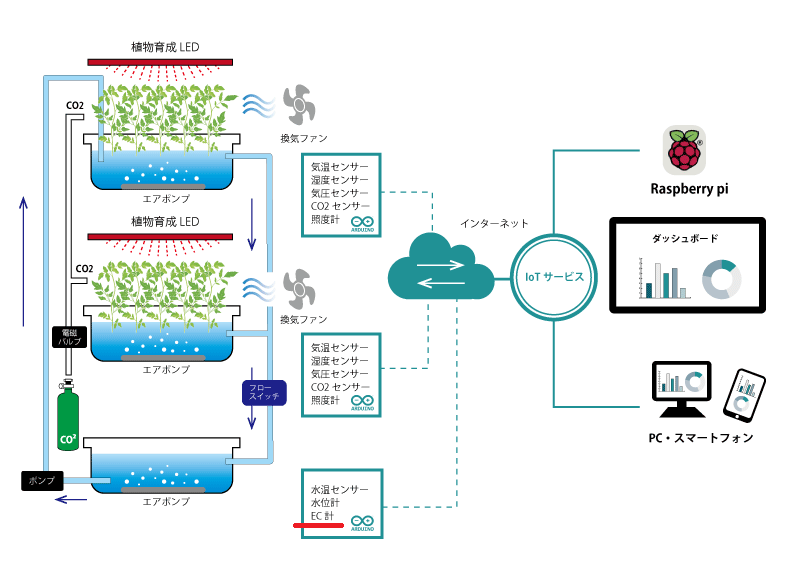
以下のシステム構成の内、赤線部分を作成します。
目次
水耕栽培とEC(電気伝導率)
液肥の濃度管理と電気伝導率
電気伝導率を測定し、溶液中の電解質成分量を求めることで、液肥の濃度を測定することができます。
電気伝導率は物質中における電気伝導のしやすさを表す物性量で、単位はジーメンス毎メートル(S/m)です。「農学分野においては肥料濃度の目安として用いられるが、この場合は英語の頭文字をとり、「EC濃度」もしくは単に「EC」と呼ぶことが多い」とのことで、単位も、「肥料濃度を表す場合は単位が大きすぎるのでミリジーメンス毎センチメートル(mS/cm)が用いられる」そうです(ウィキペディア「電気伝導率」)。
例えばハイポニカ液体肥料は、250倍に薄めた濃度が2.4mS/cmに設定されているようで(複数のサイトで記載されていることを確認したのですが、原典見つけられていません。)、この数値を基準に濃度の管理をすれば良いことになります。
電気伝導率の測定原理
電気伝導率の計算とセル定数(電極定数)
電気伝導率κ(カッパ)は、2個の電極を電解質水溶液に浸した場合の電極間の電気抵抗の逆数で示され、以下の式で求めることができます。
電気伝導率(κ)= 電圧(E)/電流(I)xセル定数(電極定数)(k)
セル定数は電極面積、電極間の距離によって求めることができますが、作成した電極の面積や距離のばらつきが大きく計算が困難なため、電気伝導率の分かっている標準液(塩化カリウム溶液)の電気伝導率を測定することで決定します。
温度補償
水溶液の電気伝導率は温度により変化します。水耕栽培の環境において、液肥を常に一定の温度に保って計測することは現実的に困難ですので、あらかじめ定めた温度(通常25℃)における電気伝導率に換算します。以下の式で換算することができます。
25℃の電気伝導率(κ25)=t℃の電気伝導率(κt)/(1+温度係数(α)(温度(t)-25))
温度変化による電気伝導率の変化量は水溶液の種類(イオン成分や濃度の違い)により異なりますが、温度係数は一般的に塩化カリウム標準液の2%/℃が使用されます。
<参考>
電気伝導率の測定は、JIS K 0130「電気伝導率測定方法通則」にて標準化されています。
また、電気伝導率の説明とその測定は以下の資料に詳しく説明されています。
「導電率測定についての基礎知識」
Arduinoを使用して電気伝導率を測定する
Arduinoを使用してECを計測する方法が“Three Dollar EC – PPM Meter [Arduino]”に紹介されていましたので、今回はこちらのページを参考にします。
測定の仕組み(参考ページの概要説明)
電気伝導率の測定
電極を水溶液に浸し電流を流して抵抗値を測定することで電気伝導率を求めます。
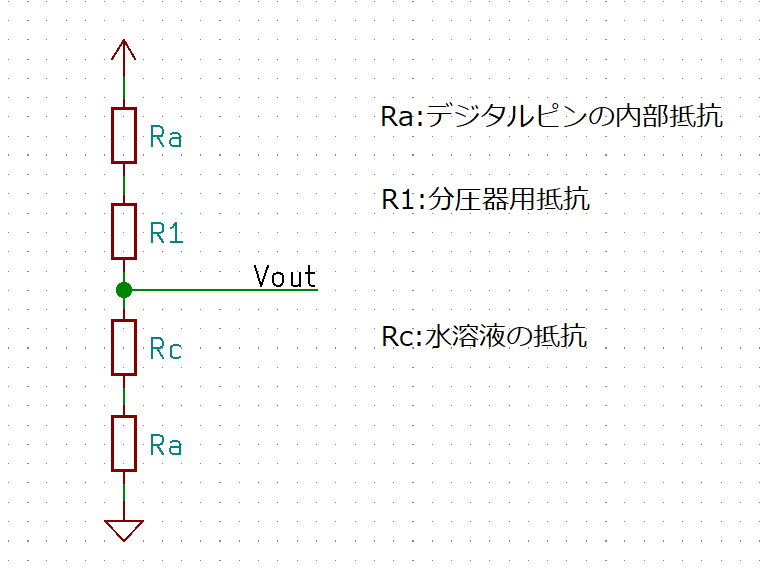
下図のように、水溶液と抵抗で分圧回路を構成し、Voutの電圧を測定することで水溶液の抵抗(Rc)を逆算することができます。
セル定数
セル定数は電極の大きさと距離によって変化します。自作するとセル定数を求めるのが大変なため、参考ページでは電気プラグを採用しています。
温度補償
温度補償のために外付けの温度センサーを接続します。
直流で計測する工夫
電気伝導率を直流電流で測定すると、分極という現象が発生し、正確な値が測定できないだけでなく、電極を痛める原因にもなります(参考:電気伝導率計の原理と応用)。交流で測定する場合、回路が複雑化するため、参考ページでは、電源の代わりにArduinoのデジタルピンを接続し、計測する瞬間のみ電流を流して分極の発生を防ぐように工夫しています。
プログラムは 参考ページ サンプルコードの下記の部分が相当します。
int ECPin= A0;
int ECGround=A1;
int ECPower =A4;

中略

//************Estimates Resistance of Liquid ****************//
digitalWrite(ECPower,HIGH);
raw= analogRead(ECPin);
raw= analogRead(ECPin);// This is not a mistake, First reading will be low beause if charged a capacitor
digitalWrite(ECPower,LOW);
8行目でArduinoのA4をHighレベルに変更した後、9,10行目で測定、測定終了後に11行目で即A4をLowレベルに変更しています。
実際にArduinoで測定してみる
まずは参考ページのとおり、Arduinoを使用して測定してみます。
使用する部品等
- Arduino Mega2560
Arduino UNOでも同様に動作するものと思います。
今回は互換ボードを使用しました。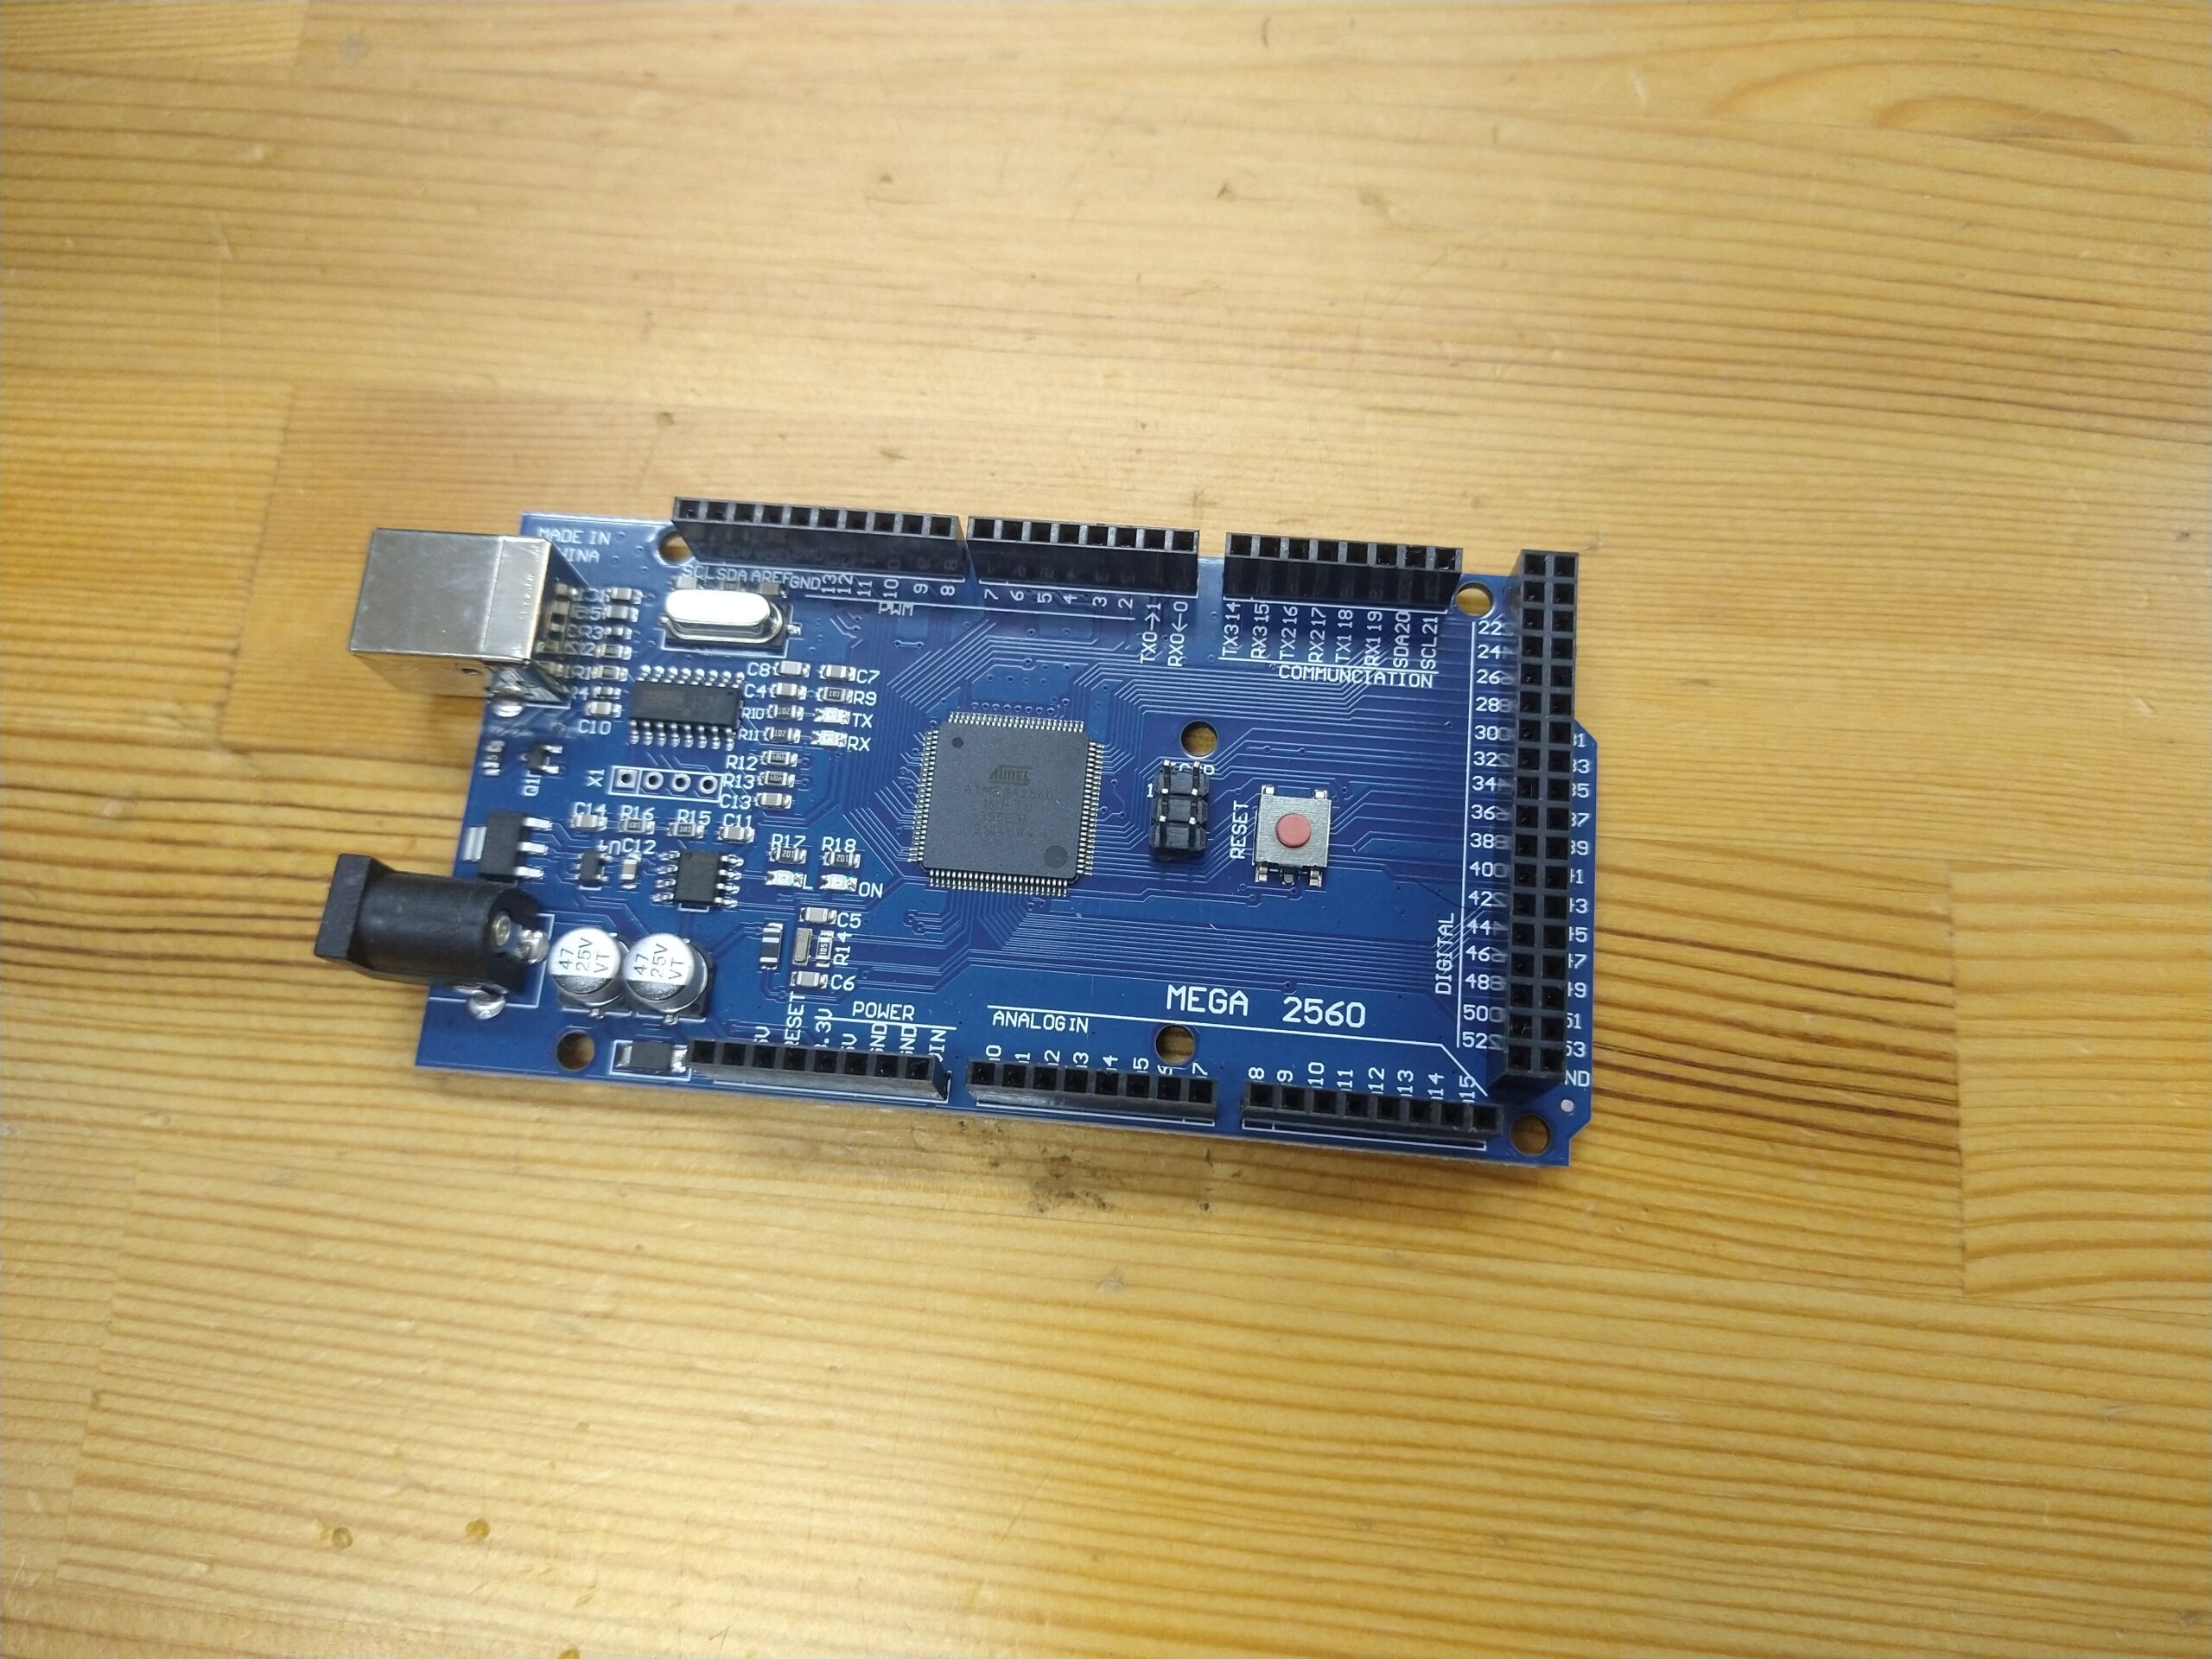
- 電極
参考ページでは電源プラグを使用していますが、EC計測専用の電極が市販されていますので、今回は専用の電極(リンク先は弊社オンラインショップです)を使用しました。
この製品は、電極の表面積を大きくするために、白金黒電極を使用しています(参考:導電率セルについてのー般事項 -なぜ白金黒電極を用いるのですか?)。また、サーミスタを内蔵していますが、デジタル温度センサーを別途接続するため、今回は使用しません。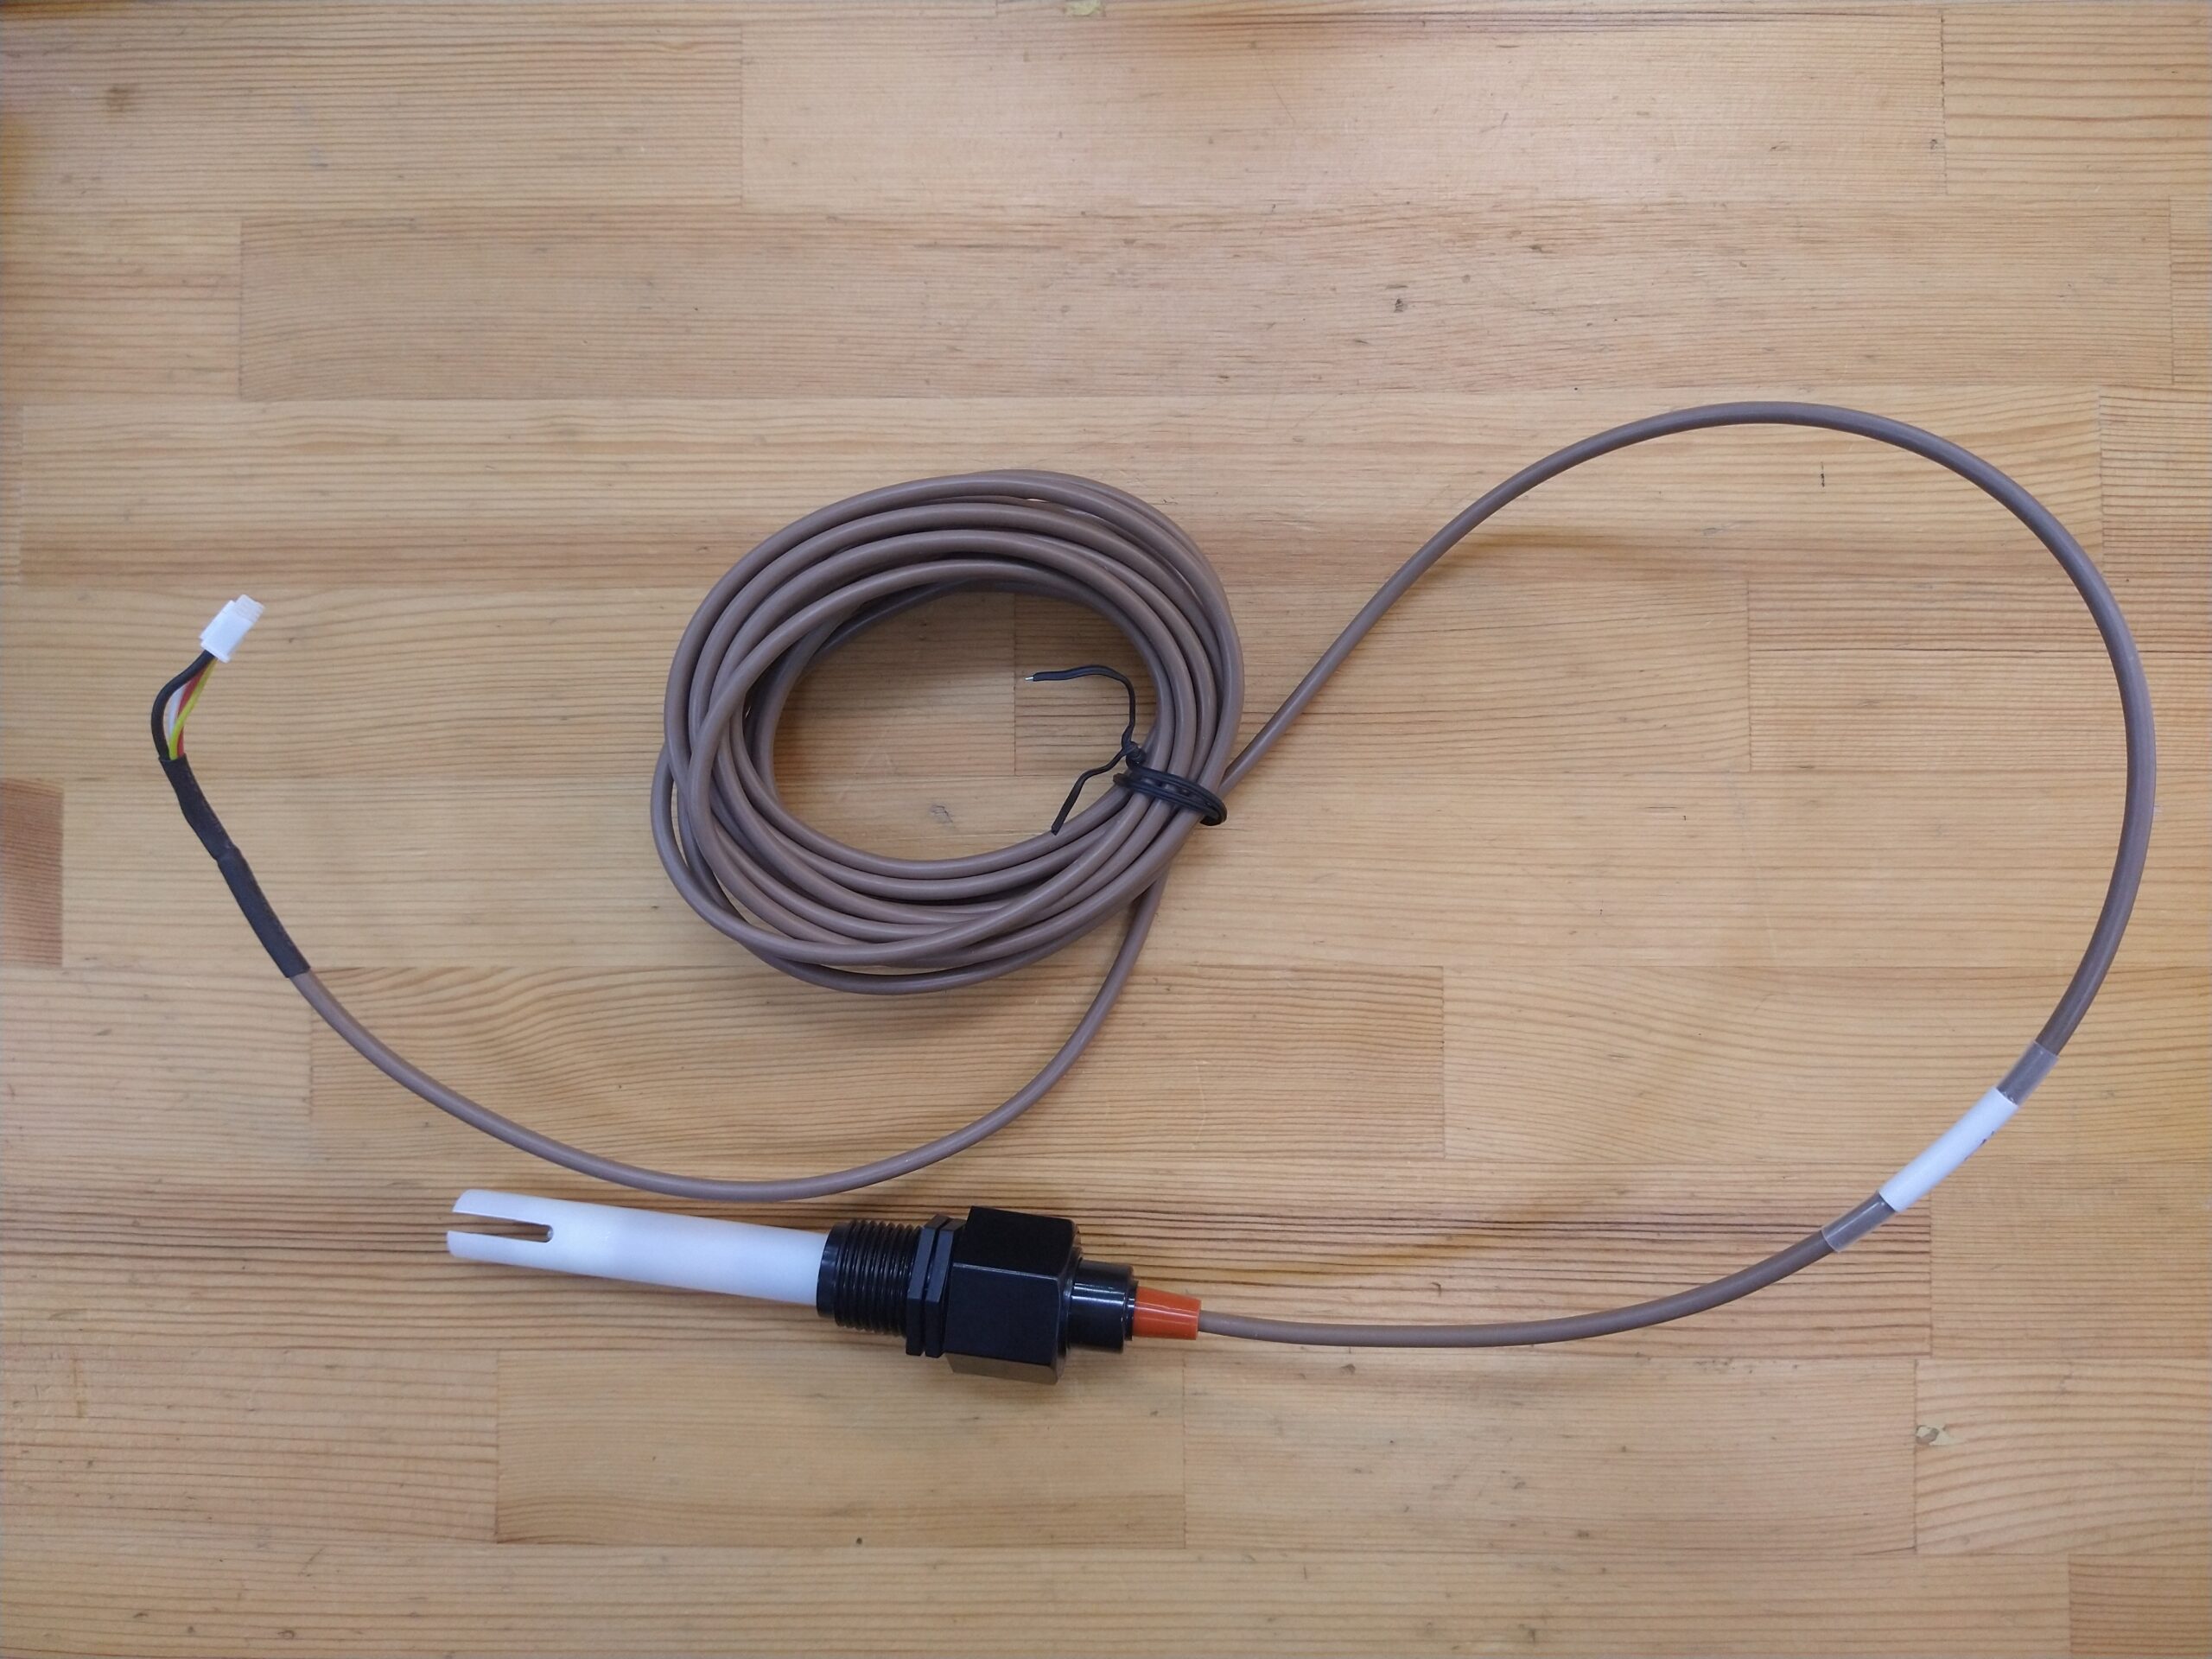
- デジタル温度センサー
参考ページでは、1-Wire接続のデジタル温度センサーDS18B20を使用しています。
今回は、防水ケースに格納されたタイプ(リンク先は弊社オンラインショップです)を使用しました。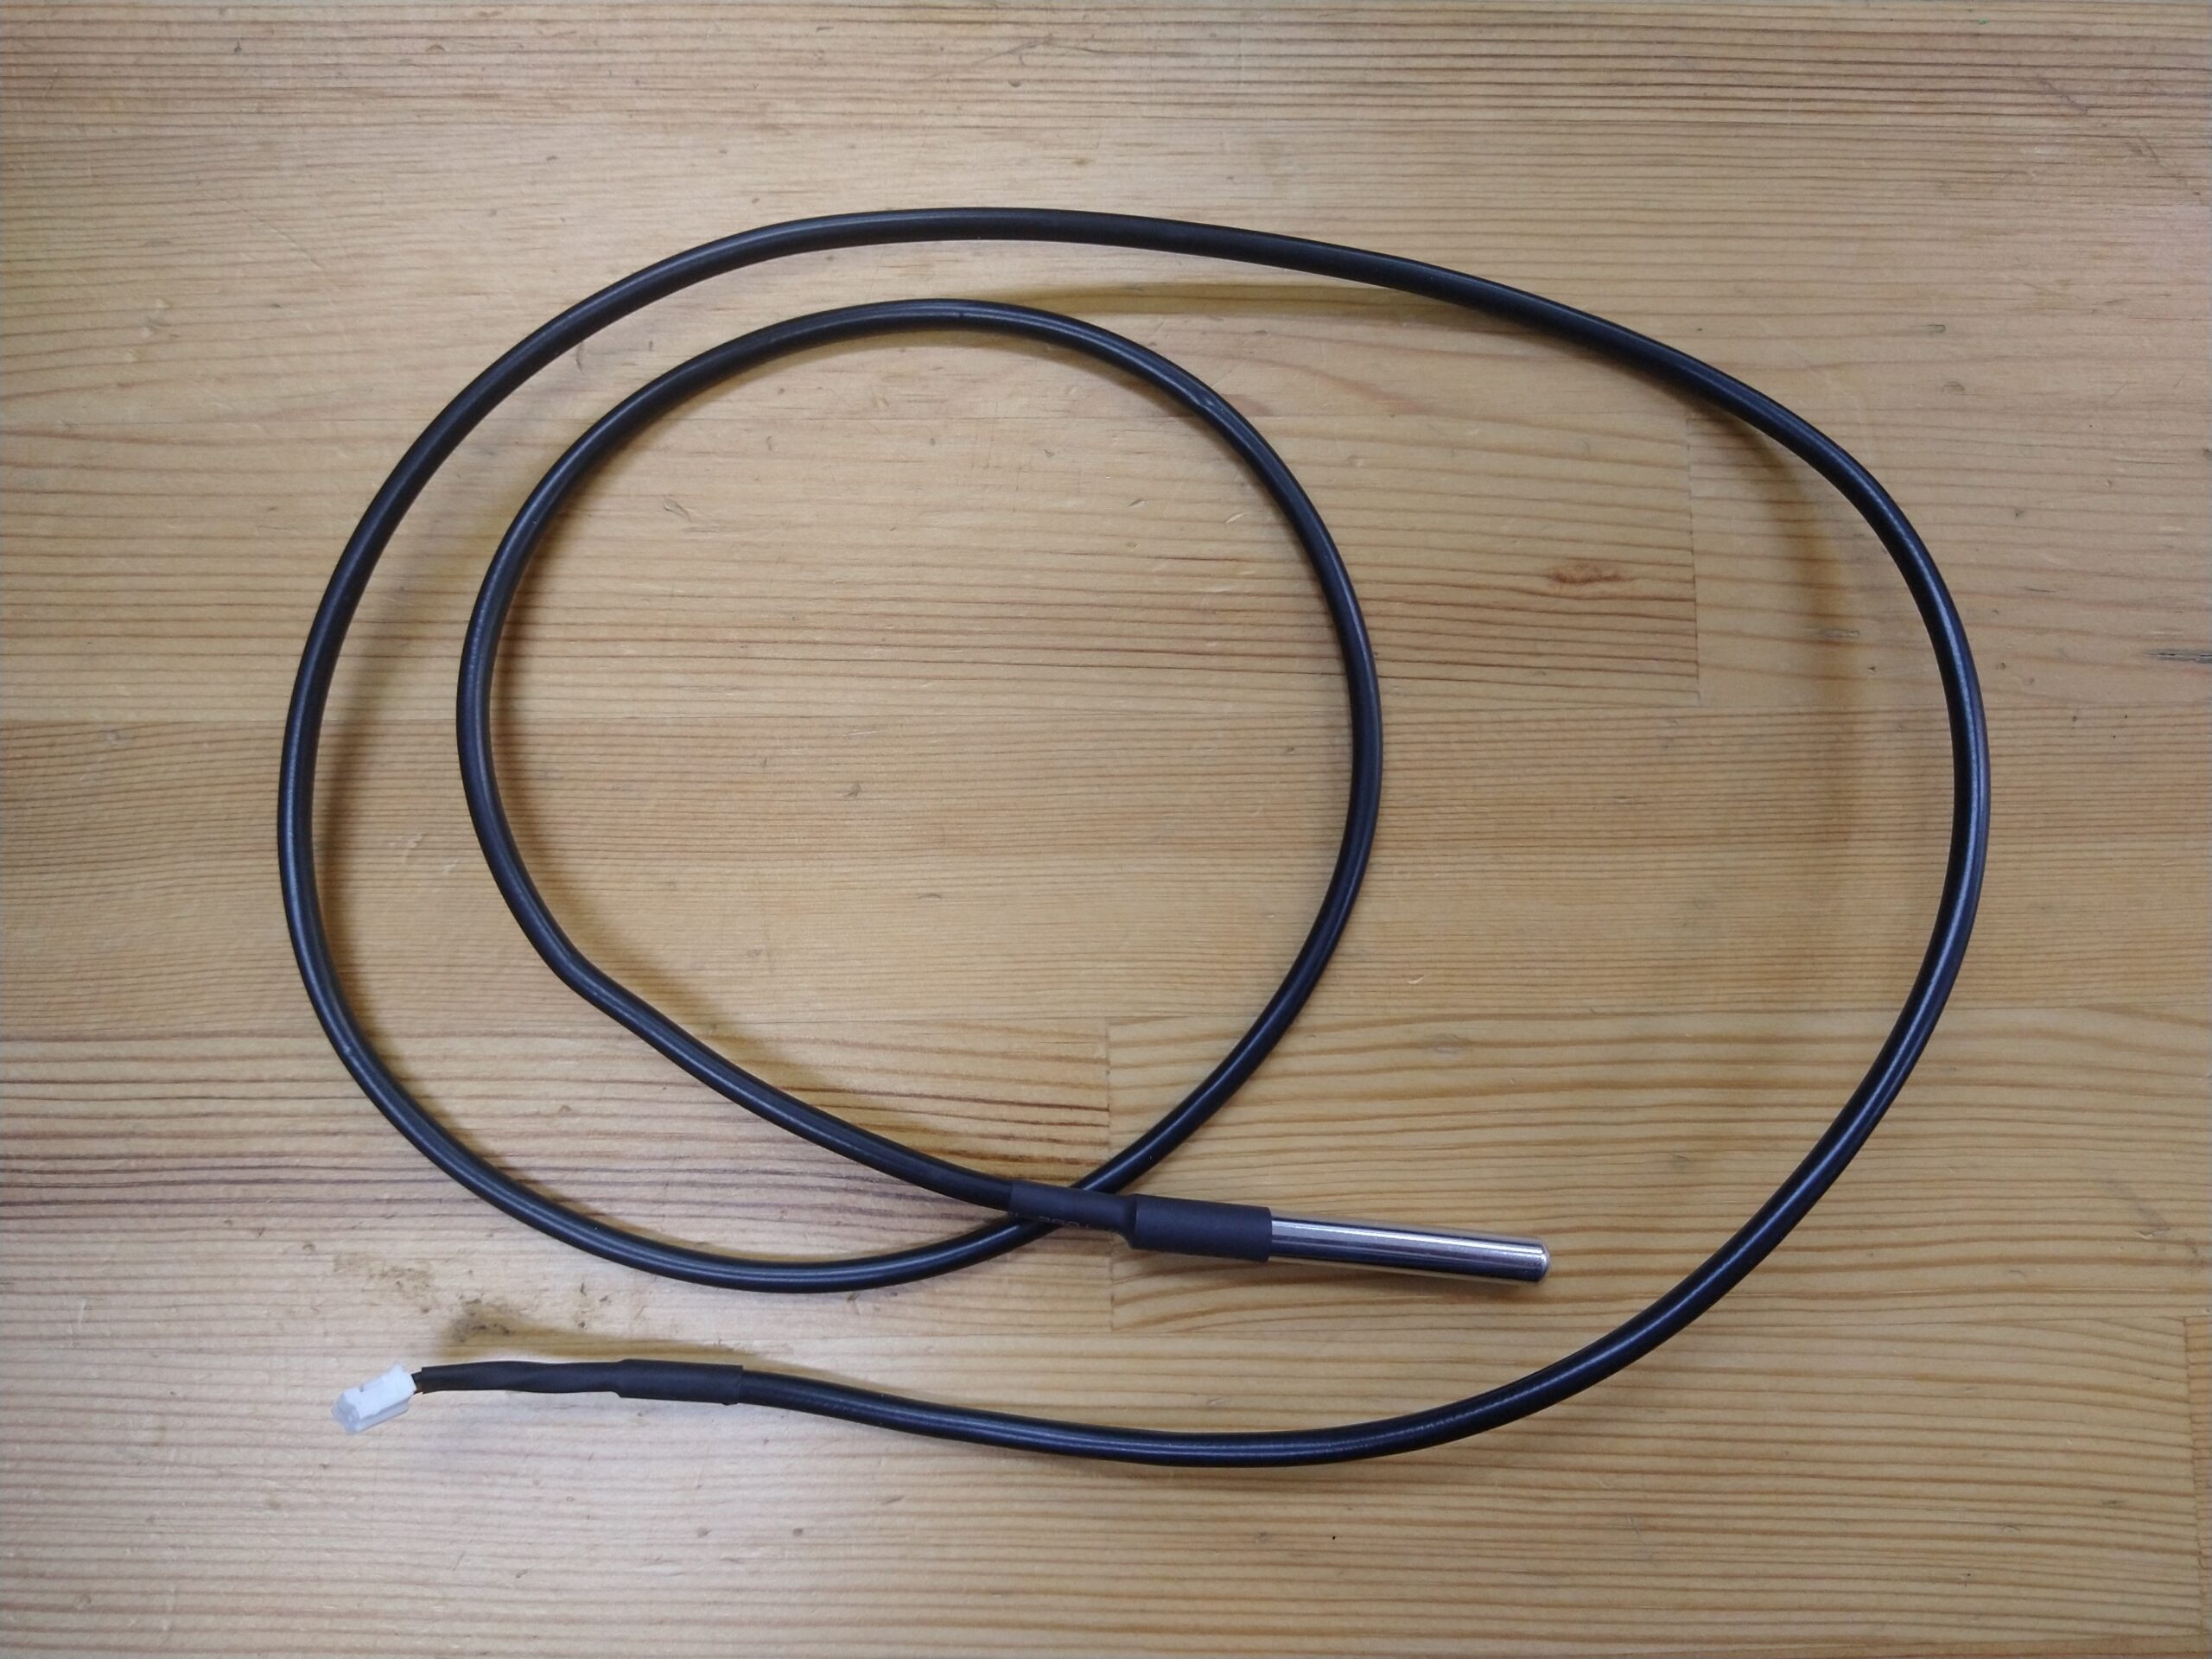
- 抵抗
一般的な1/4Wカーボン抵抗を使用します。分圧器用の1kΩと1-Wireのプルアップ用4.7kΩ各1本です。 - EC標準液
セル定数のキャリブレーション用に使用します。今回は「HANNA HI3701 1413μS/cm Conductivity Standard」を使用しました。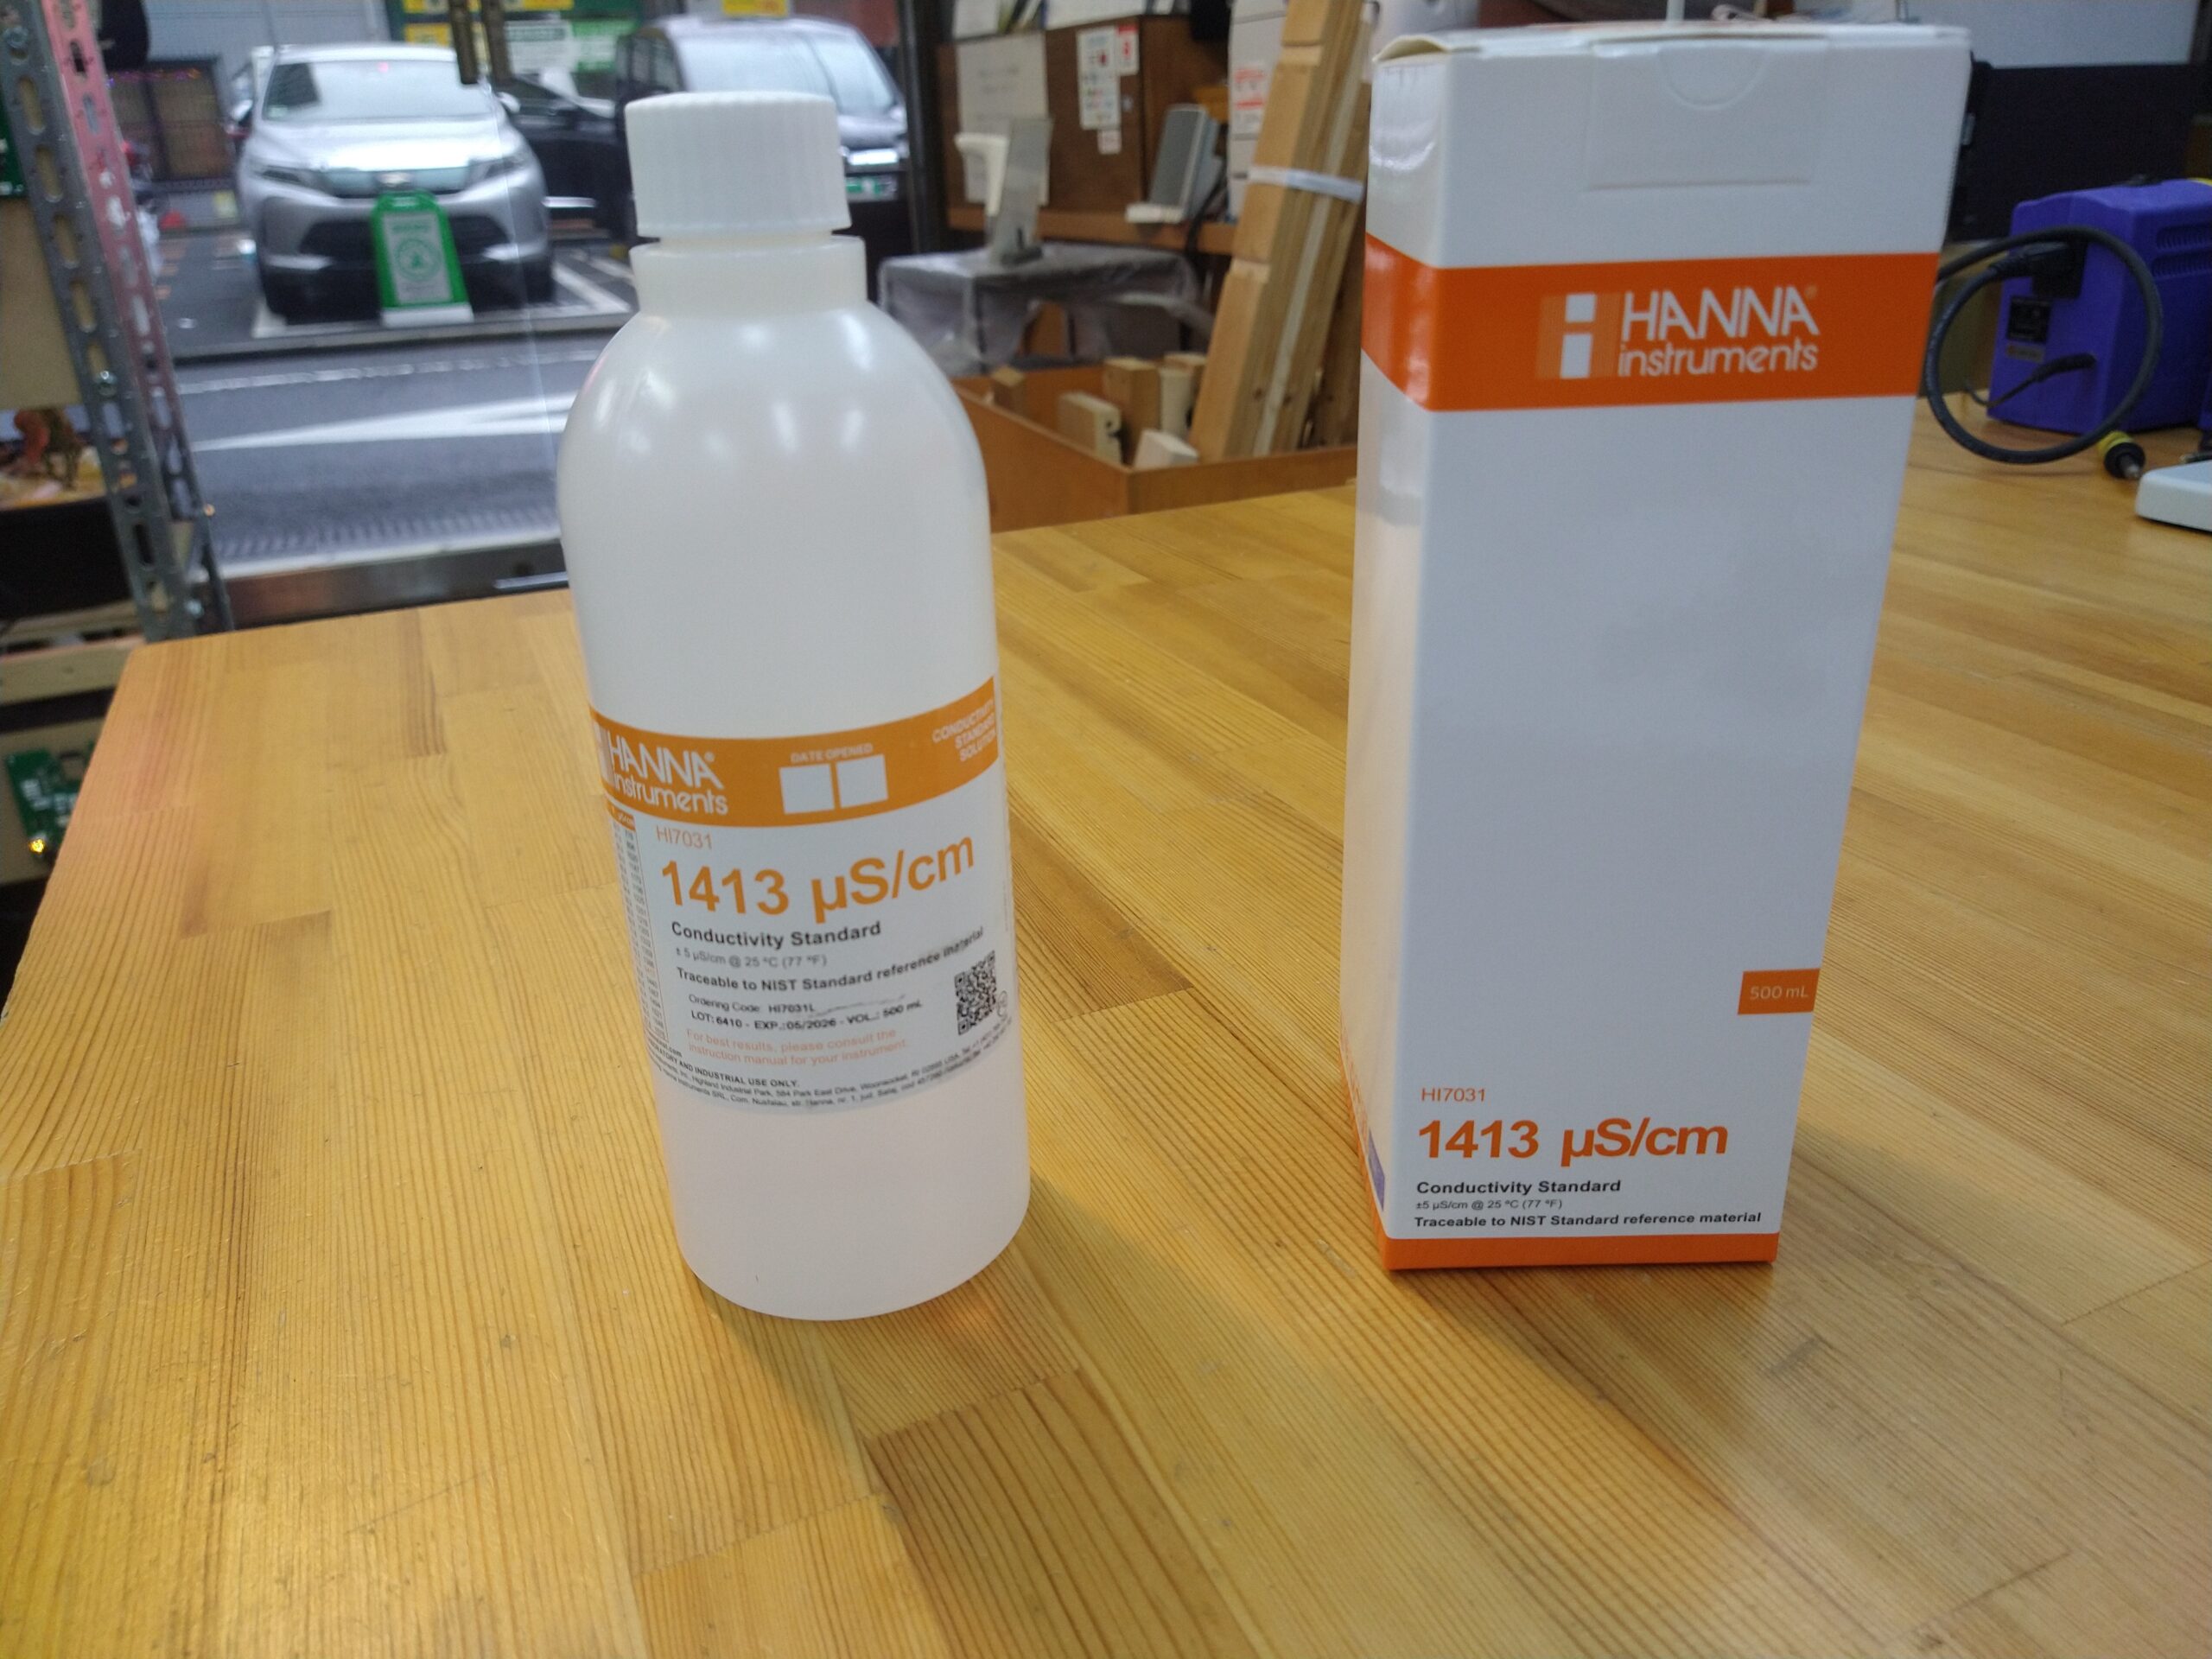
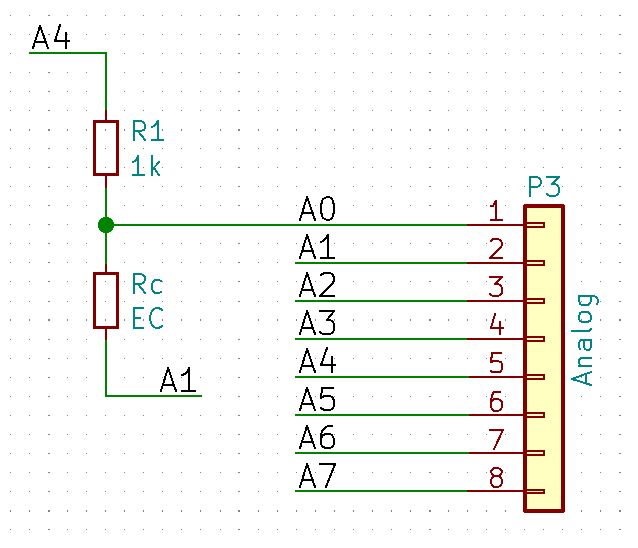
回路
回路図は以下のとおりです。P2からP7はArduino Mega2560のコネクタです。
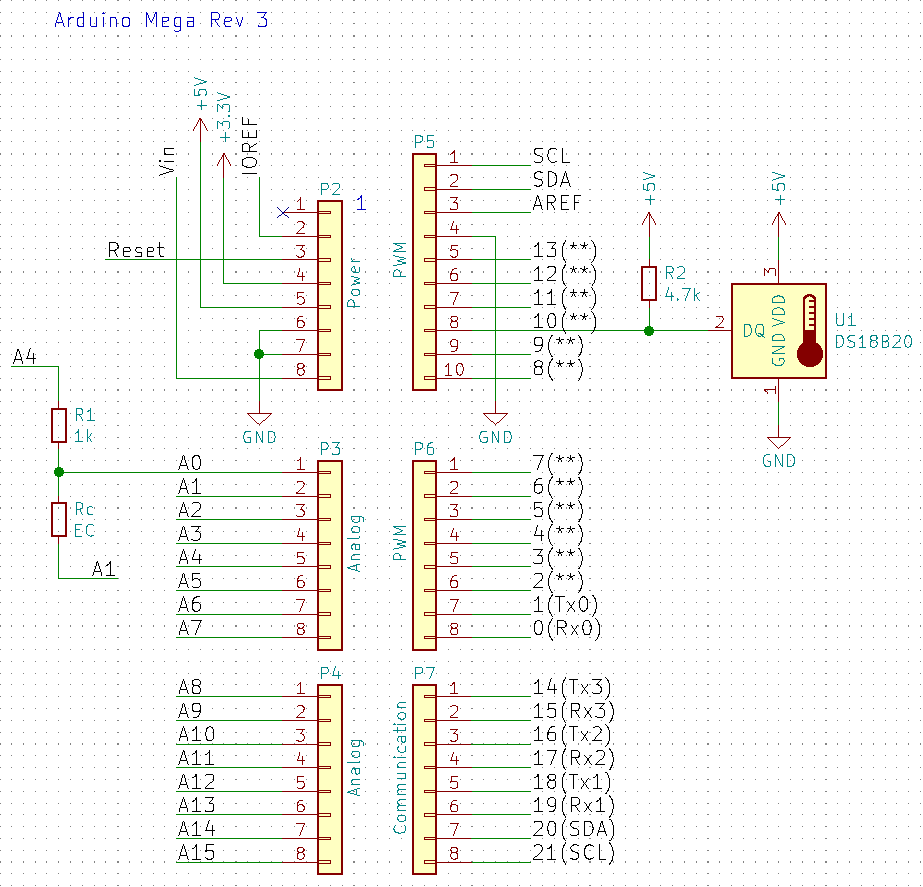
- R1:分圧器用抵抗
R1の大きさで測定レンジと分解能が決まり、参考ページのR1の説明箇所に測定レンジを説明した表があります。
今回は、測定対象が液肥で幅広い測定レンジは不要ですので、参考ページのとおり1kΩの抵抗を使用しました。 - Rc:電極
今回使用する電極のセル定数(カタログ値)は1.0です。 - U1:温度センサーDS18B20
DS18B20は1-Wire接続のデジタル温度センサーです。1-Wireはマキシム・インテグレーテッド社のデータ転送を行うためのシリアルインターフェイス規格で、1本の信号線で通信するのが特徴です。
DS18B20のデータシート P5 Figure3にDQを4.7kΩの抵抗でプルアップする例がありましたので、4.7kΩの抵抗を追加しました。
作業手順
配線
上記回路図のとおり配線します。
セル定数のキャリブレーション
EC標準液を使用してセル定数のキャリブレーションを行います。
今回使用した標準液のパッケージには温度毎の電気伝導率が表示されていました。
| ℃ | ℉ | μS/cm |
| 24 | 75.2 | 1386 |
| 25 | 77.0 | 1413 |
| 26 | 78.8 | 1440 |
温度補償を行うため、以下の手順でDS18B20を使用して液温を測ります。
温度センサーをEC標準液に浸します。
Arduino IDEで”OneWire”ライブラリをインストールします。
「スケッチ」-「ライブラリをインクルード」ー「ライブラリを管理」を選択しライブラリマネージャーを開きます。
ライブラリマネージャーで”OneWire”を検索し、インストールします。
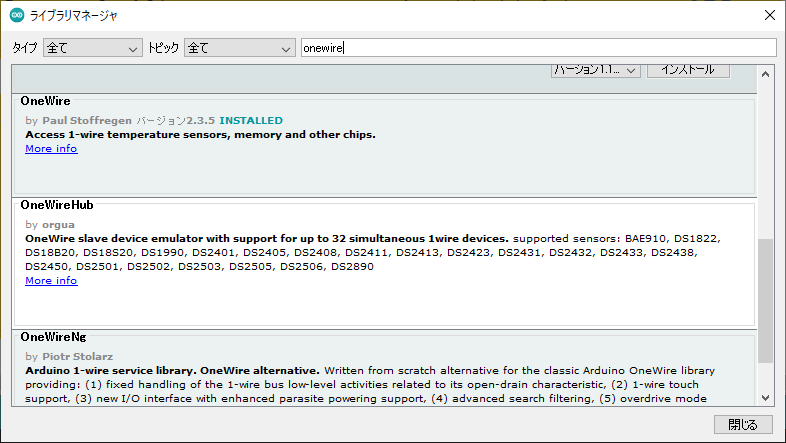
“OneWire” ライブラリをインストールしたら、「ファイル」-「スケッチ例」-「OneWire」-「DS18x20_Temperature」を開きます。
#include <OneWire.h>

// OneWire DS18S20, DS18B20, DS1822 Temperature Example
//
// http://www.pjrc.com/teensy/td_libs_OneWire.html
//
// The DallasTemperature library can do all this work for you!
// https://github.com/milesburton/Arduino-Temperature-Control-Library

OneWire  ds(10);  // on pin 10 (a 4.7K resistor is necessary)

void setup(void) {
  Serial.begin(9600);
}

void loop(void) {
  byte i;
  byte present = 0;
  byte type_s;
  byte data[12];
  byte addr[8];
  float celsius, fahrenheit;

  if ( !ds.search(addr)) {
    Serial.println("No more addresses.");
    Serial.println();
    ds.reset_search();
    delay(250);
    return;
  }

  Serial.print("ROM =");
  for( i = 0; i < 8; i++) {
    Serial.write(' ');
    Serial.print(addr[i], HEX);
  }

  if (OneWire::crc8(addr, 7) != addr[7]) {
      Serial.println("CRC is not valid!");
      return;
  }
  Serial.println();

  // the first ROM byte indicates which chip
  switch (addr[0]) {
    case 0x10:
      Serial.println("  Chip = DS18S20");  // or old DS1820
      type_s = 1;
      break;
    case 0x28:
      Serial.println("  Chip = DS18B20");
      type_s = 0;
      break;
    case 0x22:
      Serial.println("  Chip = DS1822");
      type_s = 0;
      break;
    default:
      Serial.println("Device is not a DS18x20 family device.");
      return;
  }

  ds.reset();
  ds.select(addr);
  ds.write(0x44, 1);        // start conversion, with parasite power on at the end

  delay(1000);     // maybe 750ms is enough, maybe not
  // we might do a ds.depower() here, but the reset will take care of it.

  present = ds.reset();
  ds.select(addr);
  ds.write(0xBE);         // Read Scratchpad

  Serial.print("  Data = ");
  Serial.print(present, HEX);
  Serial.print(" ");
  for ( i = 0; i < 9; i++) {           // we need 9 bytes
    data[i] = ds.read();
    Serial.print(data[i], HEX);
    Serial.print(" ");
  }
  Serial.print(" CRC=");
  Serial.print(OneWire::crc8(data, 8), HEX);
  Serial.println();

  // Convert the data to actual temperature
  // because the result is a 16 bit signed integer, it should
  // be stored to an "int16_t" type, which is always 16 bits
  // even when compiled on a 32 bit processor.
  int16_t raw = (data[1] << 8) | data[0];
  if (type_s) {
    raw = raw << 3; // 9 bit resolution default
    if (data[7] == 0x10) {
      // "count remain" gives full 12 bit resolution
      raw = (raw & 0xFFF0) + 12 - data[6];
    }
  } else {
    byte cfg = (data[4] & 0x60);
    // at lower res, the low bits are undefined, so let's zero them
    if (cfg == 0x00) raw = raw & ~7;  // 9 bit resolution, 93.75 ms
    else if (cfg == 0x20) raw = raw & ~3; // 10 bit res, 187.5 ms
    else if (cfg == 0x40) raw = raw & ~1; // 11 bit res, 375 ms
    //// default is 12 bit resolution, 750 ms conversion time
  }
  celsius = (float)raw / 16.0;
  fahrenheit = celsius * 1.8 + 32.0;
  Serial.print("  Temperature = ");
  Serial.print(celsius);
  Serial.print(" Celsius, ");
  Serial.print(fahrenheit);
  Serial.println(" Fahrenheit");
}
Arduinoに書き込み、結果をシリアルモニタで確認します。
Temperature = 25.00 Celsius, 77.00 Fahrenheit
以下の手順でセル定数を求めます。
電極を標準液に浸します。
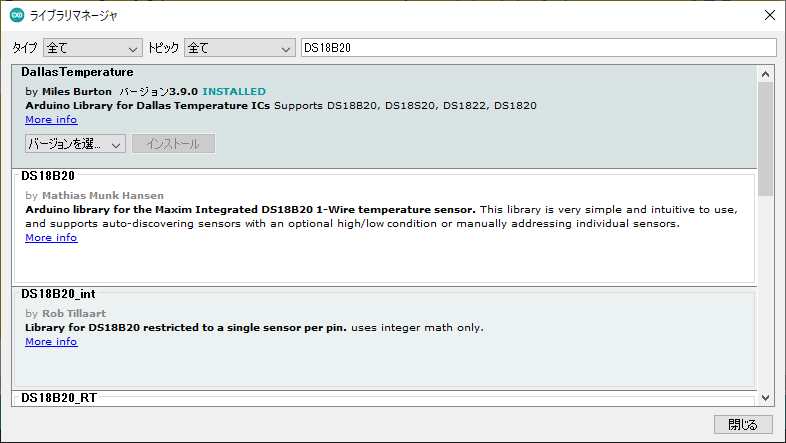
Arduino IDEで”DallasTemperature”ライブラリをインストールします。
「スケッチ」-「ライブラリをインクルード」ー「ライブラリを管理」を選択しライブラリマネージャーを開きます。
ライブラリマネージャーで”DallasTemperature”を検索し、インストールします。
参考ページの”Calibration Code”をArduino IDEに貼り付けます。
56行目の”CalibrationEC”を液温で補正した電気伝導率に書き換えます。
“CalibrationEC” の単位は mS/cm です。
1000 μS/cm = 1mS/cm です。
今回は、液温が25.0℃でしたので、上記表から “CalibrationEC=1.413” としました。
76行目の”TemperatureCoef”は前述の温度係数2%/℃を採用して、0.02としました。
/*
  ElCheapo Arduino EC-PPM measurments Calibration

  This Script is used for calibration of the sensor and fine tuning of the Cell Constant K
  Submerge the sensor and temperature probe in the calibration solution and leave for a while so the temperature probe can settle
  Change the value of the calibration solution to suit the solutiton strength
  Stir the probe to make sure the solution is well mixed and upload the code to the arduino
  Open the terminal for an update of the estimated Cell Constant K [should be around 3] and use this new value in the main EC code.


  28/8/2015  Michael Ratcliffe  Mike@MichaelRatcliffe.com


          This program is free software: you can redistribute it and/or modify
    it under the terms of the GNU General Public License as published by
    the Free Software Foundation, either version 3 of the License, or
    (at your option) any later version.


    This program is distributed in the hope that it will be useful,
    but WITHOUT ANY WARRANTY; without even the implied warranty of
    MERCHANTABILITY or FITNESS FOR A PARTICULAR PURPOSE.  See the
    GNU General Public License for more details.


    You should have received a copy of the GNU General Public License
    along with this program.  If not, see .

    Parts:
    -Arduino - Uno/Mega
    -Standard American two prong plug
    -1 kohm resistor
    -DS18B20 Waterproof Temperature Sensor


    See www.MichaelRatcliffe.com/Projects for a Pinout and user guide or consult the Zip you got this code from

*/


//************************** Libraries Needed To Compile The Script [See Read me In Download] ***************//
// Both below Library are custom ones [ SEE READ ME In Downloaded Zip If You Dont Know how To install Use them or add a pull up resistor to the temp probe


#include <OneWire.h>
#include <DallasTemperature.h>


//************************* User Defined Variables ********************************************************//


float CalibrationEC=1.413; //EC value of Calibration solution is s/cm


//##################################################################################
//-----------  Do not Replace R1 with a resistor lower than 300 ohms    ------------
//##################################################################################


int R1= 1000;
int Ra=25; //Resistance of powering Pins
int ECPin= A0;
int ECGround=A1;
int ECPower =A4;


//*************Compensating for temperature ************************************//
//The value below will change depending on what chemical solution we are measuring
//0.019 is generaly considered the standard for plant nutrients [google "Temperature compensation EC" for more info
float TemperatureCoef = 0.02; //this changes depending on what chemical we are measuring


//************ Temp Probe Related *********************************************//
#define ONE_WIRE_BUS 10          // Data wire For Temp Probe is plugged into pin 10 on the Arduino
const int TempProbePossitive =8;  //Temp Probe power connected to pin 9
const int TempProbeNegative=9;    //Temp Probe Negative connected to pin 8


//***************************** END Of Recomended User Inputs *****************************************************************//


OneWire oneWire(ONE_WIRE_BUS);// Setup a oneWire instance to communicate with any OneWire devices
DallasTemperature sensors(&oneWire);// Pass our oneWire reference to Dallas Temperature.


float TemperatureFinish=0;
float TemperatureStart=0;
float EC=0;
int ppm =0;


float raw= 0;
float Vin= 5;
float Vdrop= 0;
float Rc= 0;
float K=0;


int i=0;
float buffer=0;


//*********************************Setup - runs Once and sets pins etc ******************************************************//
void setup()
{
  Serial.begin(9600);
  pinMode(TempProbeNegative , OUTPUT ); //seting ground pin as output for tmp probe
  digitalWrite(TempProbeNegative , LOW );//Seting it to ground so it can sink current
  pinMode(TempProbePossitive , OUTPUT );//ditto but for positive
  digitalWrite(TempProbePossitive , HIGH );
  pinMode(ECPin,INPUT);
  pinMode(ECPower,OUTPUT);//Setting pin for sourcing current
  pinMode(ECGround,OUTPUT);//setting pin for sinking current
  digitalWrite(ECGround,LOW);//We can leave the ground connected permanantly

  delay(100);// gives sensor time to settle
  sensors.begin();
  delay(100);
  //** Adding Digital Pin Resistance to [25 ohm] to the static Resistor *********//
  // Consule Read-Me for Why, or just accept it as true
  R1=(R1+Ra);

  Serial.println("ElCheapo Arduino EC-PPM measurments Calibration");
  Serial.println("By: Michael Ratcliffe  Mike@MichaelRatcliffe.com");
  Serial.println("Free software: you can redistribute it and/or modify it under GNU ");
  Serial.println("");
  Serial.println("Make sure Probe and Temp Sensor are in Solution and solution is well mixed");
  Serial.println("");
  Serial.println("Starting Calibration: Estimated Time 60 Seconds:");


};
//******************************************* End of Setup **********************************************************************//


//************************************* Main Loop - Runs Forever ***************************************************************//
//Moved Heavy Work To subroutines so you can call them from main loop without cluttering the main loop
void loop()
{


  i=1;
  buffer=0;
sensors.requestTemperatures();// Send the command to get temperatures
TemperatureStart=sensors.getTempCByIndex(0); //Stores Value in Variable


//************Estimates Resistance of Liquid ****************//
while(i<=10){


digitalWrite(ECPower,HIGH);
raw= analogRead(ECPin);
raw= analogRead(ECPin);// This is not a mistake, First reading will be low
digitalWrite(ECPower,LOW);
buffer=buffer+raw;
i++;
delay(5000);
};
raw=(buffer/10);


sensors.requestTemperatures();// Send the command to get temperatures
TemperatureFinish=sensors.getTempCByIndex(0); //Stores Value in Variable


//*************Compensating For Temperaure********************//
EC =CalibrationEC*(1+(TemperatureCoef*(TemperatureFinish-25.0))) ;

//***************** Calculates R relating to Calibration fluid **************************//
Vdrop= (((Vin)*(raw))/1024.0);
Rc=(Vdrop*R1)/(Vin-Vdrop);
Rc=Rc-Ra;
K= 1000/(Rc*EC);


Serial.print("Calibration Fluid EC: ");
Serial.print(CalibrationEC);
Serial.print(" S  ");  //add units here
Serial.print("Cell Constant K");
Serial.print(K);


if (TemperatureStart==TemperatureFinish){
  Serial.println("  Results are Trustworthy");
  Serial.println("  Safe To Use Above Cell Constant in Main EC code");

}
else{
  Serial.println("  Error -Wait For Temperature To settle");

}


}
//************************************** End Of Main Loop **********************************************************************//
Arduinoに書き込み、結果をシリアルモニタで確認します。
lCheapo Arduino EC-PPM measurments Calibration
By: Michael Ratcliffe  Mike@MichaelRatcliffe.com
Free software: you can redistribute it and/or modify it under GNU

Make sure Probe and Temp Sensor are in Solution and solution is well mixed

Starting Calibration: Estimated Time 60 Seconds:
Calibration Fluid EC: 1.41 S  Cell Constant K1.03  Results are Trustworthy
  Safe To Use Above Cell Constant in Main EC code
Calibration Fluid EC: 1.41 S  Cell Constant K1.03  Results are Trustworthy
  Safe To Use Above Cell Constant in Main EC code
Calibration Fluid EC: 1.41 S  Cell Constant K1.03  Error -Wait For Temperature To settle
Calibration Fluid EC: 1.41 S  Cell Constant K1.03  Error -Wait For Temperature To settle
セル定数1.03と出ました。
“Error -Wait For Temperature To settle”のエラーは、測定中に液温が変動した場合に表示されます(上記例はあえてエラーを発生させています)。
電気伝導率の測定
以下の手順で電気伝導率を測定します。
参考ページの”EC PPM Measurement Code”をArduino IDEに貼り付けます。
82行目を上記同様”TemperatureCoef = 0.02″に書き換えます。
90行目は上記で求めたセル定数1.03に合わせて、”K=1.03″に書き換えます。
/*
  ElCheapo Arduino EC-PPM measurments

  This scrip uses a common USA two prong plug and a 47Kohm Resistor to measure the EC/PPM of a Aquaponics/Hydroponics Sytem.
  You could modift this code to Measure other liquids if you change the resitor and values at the top of the code.

  This Program will give you a temperature based feed controller. See Read me in download file for more info.

  28/8/2015  Michael Ratcliffe  Mike@MichaelRatcliffe.com


          This program is free software: you can redistribute it and/or modify
    it under the terms of the GNU General Public License as published by
    the Free Software Foundation, either version 3 of the License, or
    (at your option) any later version.


    This program is distributed in the hope that it will be useful,
    but WITHOUT ANY WARRANTY; without even the implied warranty of
    MERCHANTABILITY or FITNESS FOR A PARTICULAR PURPOSE.  See the
    GNU General Public License for more details.


    You should have received a copy of the GNU General Public License
    along with this program.  If not, see .

    Parts:
    -Arduino - Uno/Mega
    -Standard American two prong plug
    -1 kohm resistor
    -DS18B20 Waterproof Temperature Sensor

    Limitations:
    -
    -

    See www.MichaelRatcliffe.com/Projects for a Pinout and user guide or consult the Zip you got this code from

*/


//************************** Libraries Needed To Compile The Script [See Read me In Download] ***************//
// Both below Library are custom ones [ SEE READ ME In Downloaded Zip If You Dont Know how To install] Use them or add a pull up resistor to the temp probe


#include <OneWire.h>
#include <DallasTemperature.h>


//************************* User Defined Variables ********************************************************//


//##################################################################################
//-----------  Do not Replace R1 with a resistor lower than 300 ohms    ------------
//##################################################################################


int R1= 1000;
int Ra=25; //Resistance of powering Pins
int ECPin= A0;
int ECGround=A1;
int ECPower =A4;


//*********** Converting to ppm [Learn to use EC it is much better**************//
// Hana      [USA]        PPMconverion:  0.5
// Eutech    [EU]          PPMconversion:  0.64
//Tranchen  [Australia]  PPMconversion:  0.7
// Why didnt anyone standardise this?


float PPMconversion=0.7;


//*************Compensating for temperature ************************************//
//The value below will change depending on what chemical solution we are measuring
//0.019 is generaly considered the standard for plant nutrients [google "Temperature compensation EC" for more info
float TemperatureCoef = 0.02; //this changes depending on what chemical we are measuring


//********************** Cell Constant For Ec Measurements *********************//
//Mine was around 2.9 with plugs being a standard size they should all be around the same
//But If you get bad readings you can use the calibration script and fluid to get a better estimate for K
float K=1.03;


//************ Temp Probe Related *********************************************//
#define ONE_WIRE_BUS 10          // Data wire For Temp Probe is plugged into pin 10 on the Arduino
const int TempProbePossitive =8;  //Temp Probe power connected to pin 9
const int TempProbeNegative=9;    //Temp Probe Negative connected to pin 8


//***************************** END Of Recomended User Inputs *****************************************************************//


OneWire oneWire(ONE_WIRE_BUS);// Setup a oneWire instance to communicate with any OneWire devices
DallasTemperature sensors(&oneWire);// Pass our oneWire reference to Dallas Temperature.


float Temperature=10;
float EC=0;
float EC25 =0;
int ppm =0;


float raw= 0;
float Vin= 5;
float Vdrop= 0;
float Rc= 0;
float buffer=0;


//*********************************Setup - runs Once and sets pins etc ******************************************************//
void setup()
{
  Serial.begin(9600);
  pinMode(TempProbeNegative , OUTPUT ); //seting ground pin as output for tmp probe
  digitalWrite(TempProbeNegative , LOW );//Seting it to ground so it can sink current
  pinMode(TempProbePossitive , OUTPUT );//ditto but for positive
  digitalWrite(TempProbePossitive , HIGH );
  pinMode(ECPin,INPUT);
  pinMode(ECPower,OUTPUT);//Setting pin for sourcing current
  pinMode(ECGround,OUTPUT);//setting pin for sinking current
  digitalWrite(ECGround,LOW);//We can leave the ground connected permanantly

  delay(100);// gives sensor time to settle
  sensors.begin();
  delay(100);
  //** Adding Digital Pin Resistance to [25 ohm] to the static Resistor *********//
  // Consule Read-Me for Why, or just accept it as true
  R1=(R1+Ra);// Taking into acount Powering Pin Resitance

  Serial.println("ElCheapo Arduino EC-PPM measurments");
  Serial.println("By: Michael Ratcliffe  Mike@MichaelRatcliffe.com");
  Serial.println("Free software: you can redistribute it and/or modify it under GNU ");
  Serial.println("");
  Serial.println("Make sure Probe and Temp Sensor are in Solution and solution is well mixed");
  Serial.println("");
  Serial.println("Measurments at 5's Second intervals [Dont read Ec morre than once every 5 seconds]:");


};
//******************************************* End of Setup **********************************************************************//


//************************************* Main Loop - Runs Forever ***************************************************************//
//Moved Heavy Work To subroutines so you can call them from main loop without cluttering the main loop
void loop()
{


GetEC();          //Calls Code to Go into GetEC() Loop [Below Main Loop] dont call this more that 1/5 hhz [once every five seconds] or you will polarise the water
PrintReadings();  // Cals Print routine [below main loop]


delay(5000);


}
//************************************** End Of Main Loop **********************************************************************//


//************ This Loop Is called From Main Loop************************//
void GetEC(){


//*********Reading Temperature Of Solution *******************//
sensors.requestTemperatures();// Send the command to get temperatures
Temperature=sensors.getTempCByIndex(0); //Stores Value in Variable


//************Estimates Resistance of Liquid ****************//
digitalWrite(ECPower,HIGH);
raw= analogRead(ECPin);
raw= analogRead(ECPin);// This is not a mistake, First reading will be low beause if charged a capacitor
digitalWrite(ECPower,LOW);


//***************** Converts to EC **************************//
Vdrop= (Vin*raw)/1024.0;
Rc=(Vdrop*R1)/(Vin-Vdrop);
Rc=Rc-Ra; //acounting for Digital Pin Resitance
EC = 1000/(Rc*K);


//*************Compensating For Temperaure********************//
EC25  =  EC/ (1+ TemperatureCoef*(Temperature-25.0));
ppm=(EC25)*(PPMconversion*1000);


;}
//************************** End OF EC Function ***************************//


//***This Loop Is called From Main Loop- Prints to serial usefull info ***//
void PrintReadings(){
Serial.print("Rc: ");
Serial.print(Rc);
Serial.print(" EC: ");
Serial.print(EC25);
Serial.print(" Simens  ");
Serial.print(ppm);
Serial.print(" ppm  ");
Serial.print(Temperature);
Serial.println(" *C ");


/*
//********** Usued for Debugging ************
Serial.print("Vdrop: ");
Serial.println(Vdrop);
Serial.print("Rc: ");
Serial.println(Rc);
Serial.print(EC);
Serial.println("Siemens");
//********** end of Debugging Prints *********
*/
};
Arduinoに書き込み、結果をシリアルモニタで確認します。
ElCheapo Arduino EC-PPM measurments
By: Michael Ratcliffe  Mike@MichaelRatcliffe.com
Free software: you can redistribute it and/or modify it under GNU

Make sure Probe and Temp Sensor are in Solution and solution is well mixed

Measurments at 5's Second intervals [Dont read Ec morre than once every 5 seconds]:
Rc: 1032.54 EC: 0.78 Simens  543 ppm  24.94 *C
Rc: 542.72 EC: 1.48 Simens  1033 ppm  24.94 *C
Rc: 521.26 EC: 1.54 Simens  1075 ppm  24.94 *C
Rc: 509.58 EC: 1.57 Simens  1100 ppm  24.94 *C
Rc: 530.72 EC: 1.51 Simens  1056 ppm  24.94 *C
Rc: 540.30 EC: 1.48 Simens  1037 ppm  24.94 *C
Rc: 516.57 EC: 1.55 Simens  1085 ppm  24.94 *C
Rc: 509.58 EC: 1.57 Simens  1100 ppm  24.94 *C
Rc: 521.26 EC: 1.54 Simens  1075 ppm  24.94 *C
Rc: 537.90 EC: 1.49 Simens  1042 ppm  24.94 *C
Rc: 516.57 EC: 1.55 Simens  1085 ppm  24.94 *C
Rc: 511.90 EC: 1.56 Simens  1095 ppm  24.94 *C
Rc: 540.30 EC: 1.48 Simens  1037 ppm  24.94 *C
Rc: 511.90 EC: 1.56 Simens  1095 ppm  24.94 *C
Rc: 537.90 EC: 1.49 Simens  1042 ppm  24.94 *C
Rc: 509.58 EC: 1.57 Simens  1100 ppm  24.94 *C
Rc: 537.90 EC: 1.49 Simens  1042 ppm  24.94 *C
Rc: 509.58 EC: 1.57 Simens  1100 ppm  24.94 *C
Rc: 537.90 EC: 1.49 Simens  1042 ppm  24.94 *C
Rc: 507.27 EC: 1.58 Simens  1105 ppm  24.94 *C
Rc: 533.11 EC: 1.50 Simens  1051 ppm  24.94 *C
Rc: 525.98 EC: 1.52 Simens  1066 ppm  24.94 *C
Rc: 507.27 EC: 1.58 Simens  1105 ppm  24.94 *C
Rc: 535.50 EC: 1.50 Simens  1047 ppm  24.94 *C
Rc: 530.72 EC: 1.51 Simens  1056 ppm  24.94 *C
Rc: 507.27 EC: 1.58 Simens  1105 ppm  24.94 *C
Rc: 507.27 EC: 1.58 Simens  1105 ppm  24.94 *C
Rc: 511.90 EC: 1.56 Simens  1095 ppm  24.94 *C
Rc: 533.11 EC: 1.50 Simens  1051 ppm  24.94 *C
Rc: 537.90 EC: 1.49 Simens  1042 ppm  24.94 *C
Rc: 509.58 EC: 1.57 Simens  1100 ppm  24.94 *C
Rc: 511.90 EC: 1.56 Simens  1095 ppm  24.94 *C
Rc: 537.90 EC: 1.49 Simens  1042 ppm  24.94 *C
ハイポニカ液体肥料でも濃度を測ってみました。500倍希釈で約1.3mS/cm、250倍希釈で約2.45mS/cmでした。全体的に10%強の誤差があるようですが、液肥の濃度管理には使えそうです。
次回は、上記で得られた結果を基に、ESP32で電気伝導率を測定します。